Building An Active Directory Lab on Proxmox Server
Active Directory is one commonly used in enterprise networks. Its main purpose is to create a centralized storage of credentials at the Domain Controller so any attacker that has taken control over a particular machine cannot get the login credentials to the account using it. However, on the flip side, this is also means it’s game over if the attack did manage to take control of the DC since all the eggs are put in one basket. There are many attacks one can conduct against an Active Directory environment to let that happen. To explore that further, I have decided to set one up myself at on my Proxmox Server.
I was able to set my Active Directory homelab up thanks to The Cyber Mentor’s tutorial video. Definitely check him out if I failed to explain something clearly.
Materials Needed
Here is what you need to build an Active Directory Lab on a Proxmox Server
- Proxmox Server: Click here to learn how to set one up
- Windows Server 2019 iso: For the Domain Controller, install is valid for 180 days, you can get it from Microsoft.
- Windows 10 Enterprise Edition iso: For the workstations, install is valid for 90 days, you can get it from Microsoft
- VirtIO drivers: Download Link
- OPTIONAL: PfSense install iso: for putting your AD environment behind a firewall.
Setting up the Domain Controller
Creating Virtual Machine
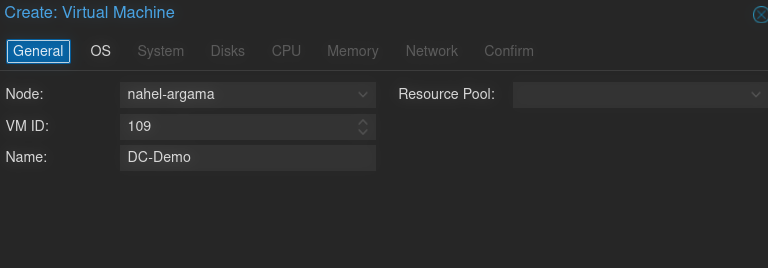
First you want to create a Windows VM on your Proxmox server. On the web console, click create VM and give it a name after the creation menu pops up.
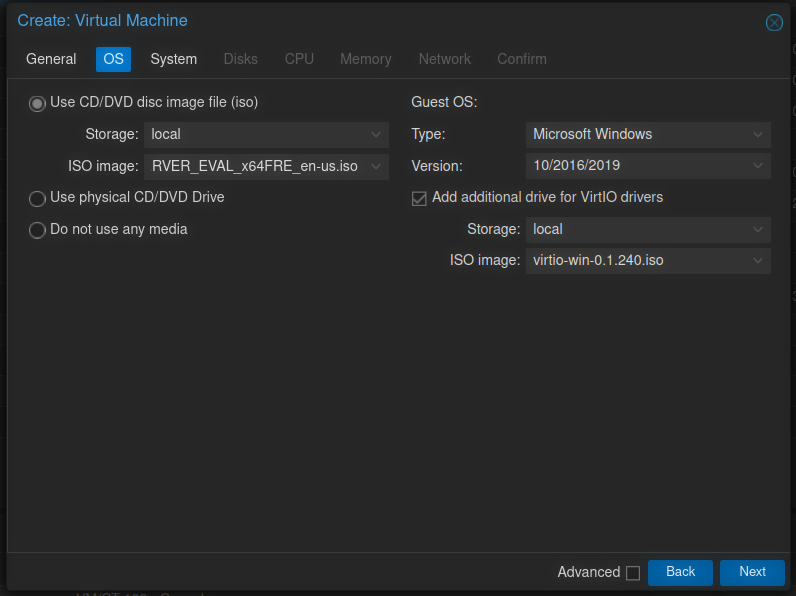
Next, you want to select the Windows Server 2019 image as your main OS ISO. On the Guest OS section, Select Microsoft Windows for type and 10/2016/2019 for version. Also check the box for Add additional drive for VirtIO drivers, and add the VirtIO Driver ISO to your VM.
On the System tab, enable Qemu Agent and leave everything else default.

For the disk, select your desired storage location and set the size to at least 64 gigs (Microsoft says the minimum is 32GB, I personally wanted more just in case)

For CPU and Memory, give as much or as little as you like. I went with 4 cores and 4 gigs here.
For network, you can leave it as default, but keep in mind that the VirtIO network card won’t work until you install the drivers.
Installing Windows Server 2019
If you have ever used Windows installers, this will be easy. However there is still some things to pay attention to.
First, select Windows Server 2019 Datacenter Evaluation (Desktop Experience) as your OS version. I believe the Datacenter version gives you access to the Domain Controller function.
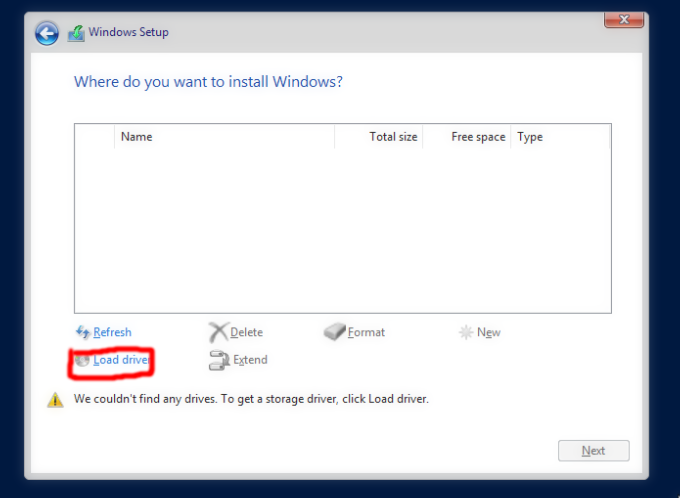
Next, If you see nothing on your disk list, don’t worry. This is because the Virtio Driver is required to use the disk. Click Load Driver option in the lower left corner, and select Windows Server 2019 as the driver to install. If you don’t see anything, make sure you have created a CD Drive for the VirtIO Driver.
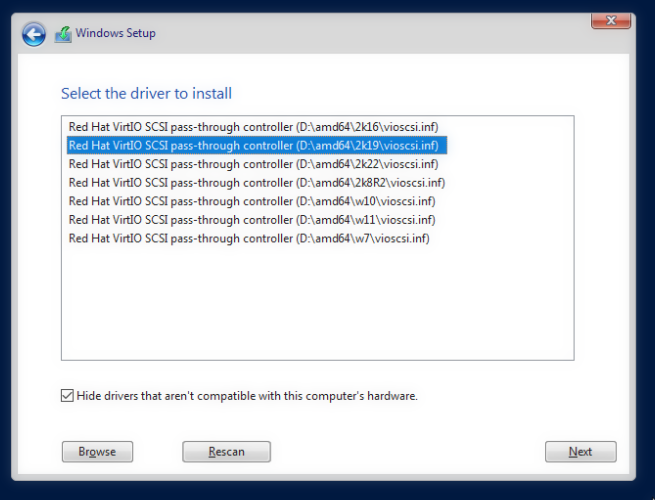
Now you should see your virtual disk and you can proceed as usual. Grab a cup of your favorite drink and wait for Windows to install.
One last step after the install is completed: we need to install VirtIO drivers. To do so, simply navigate to your CD drive and run the installer.
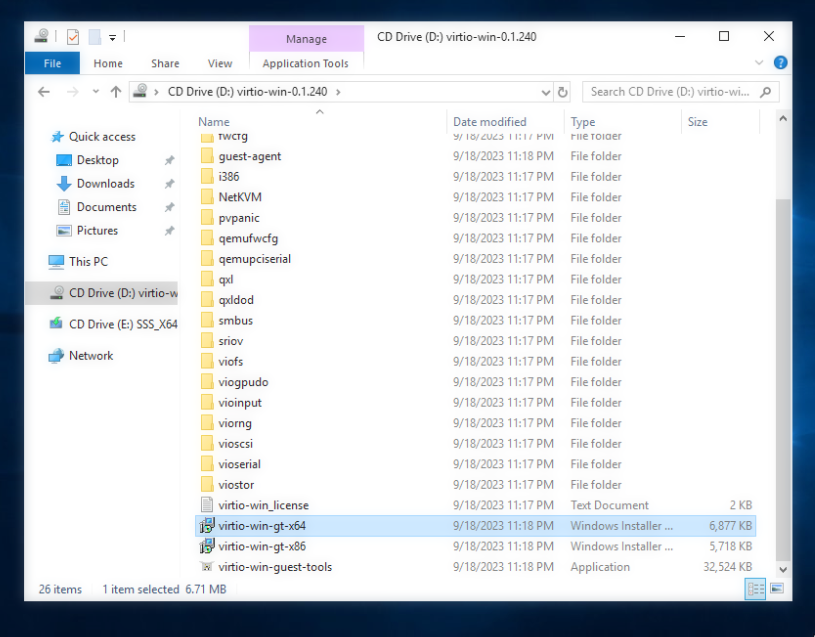
This installer will install the network card driver as well other VirtIO drivers like the VirtIO graphics card if you are using that.
Promoting Our Server to Domain Controller
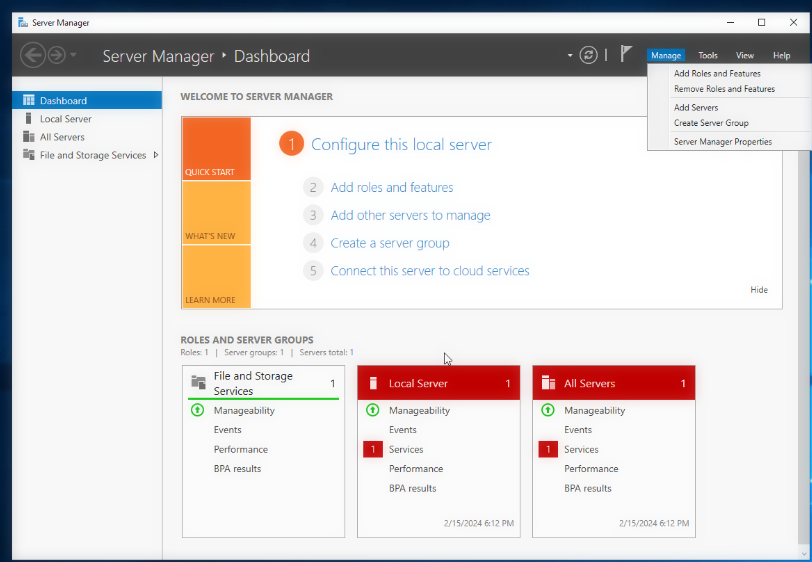
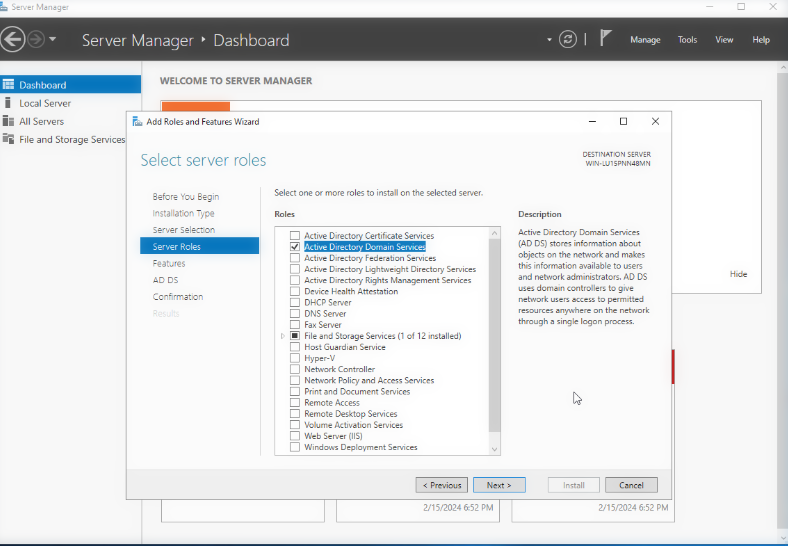
Go to Server Manager-> Add Roles and Features, and hit next until you reach the Server Roles menu.
Check the box for Active Directory Domain Services, and then continue along the menu and install the feature. Wait until the install is complete.
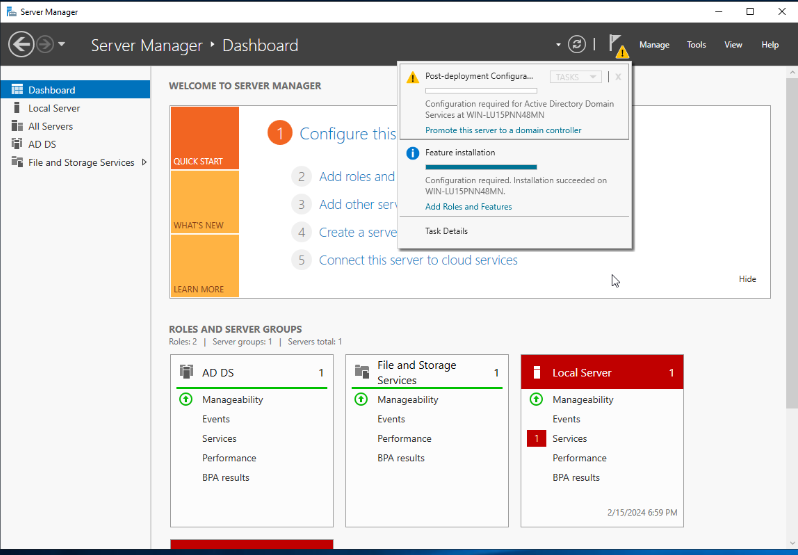
Finally, we need to promote the server to the domain controller. Click on the flag with the yellow triangle in the Server Manager main menu, and then click on the link promote this server to a domain controller
Select Add a new forest, then give the domain a name. Usuall it’s in the form of <ALL_CAPS_NAME>.local by convention.
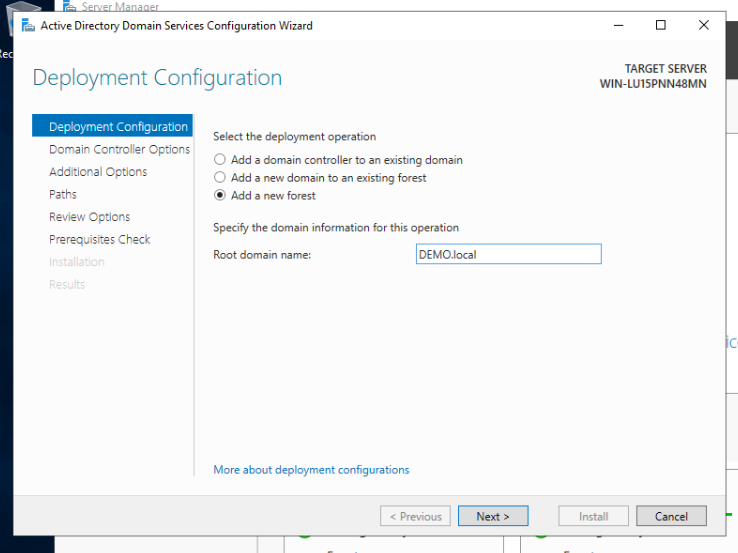
In the Domain Controller Options tab, give your domain a restore password, then advance to prerequites check. If that comes out with no problem, click install then reboot your server.
Setting up a Certificate Authority
To set up LDAP services and explore its related attacks, we must first install a CA on our domain controller.
In server manager, we go back to Add Roles and Features, and this time we check the box for Active Directory Certificate Services instead. Then advance through the prompt and install the feature.
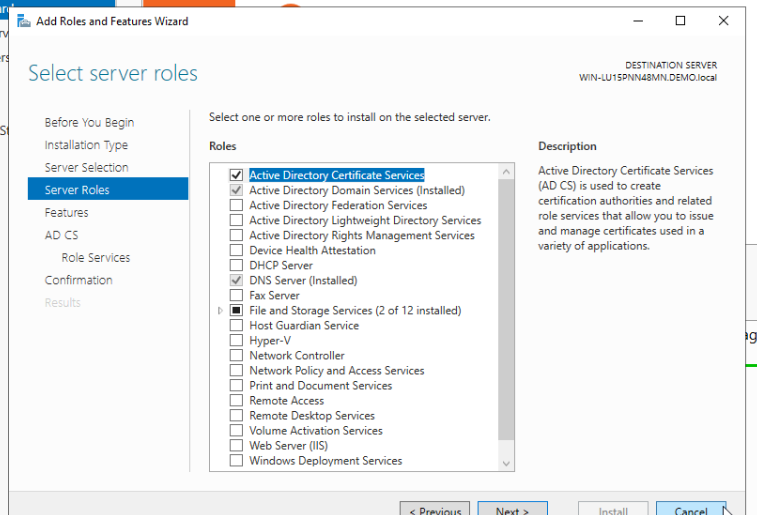
After this is completed, similar to promoting to DC, we click on the flag and then Configure Active Directory Certificate Services on the destination server.
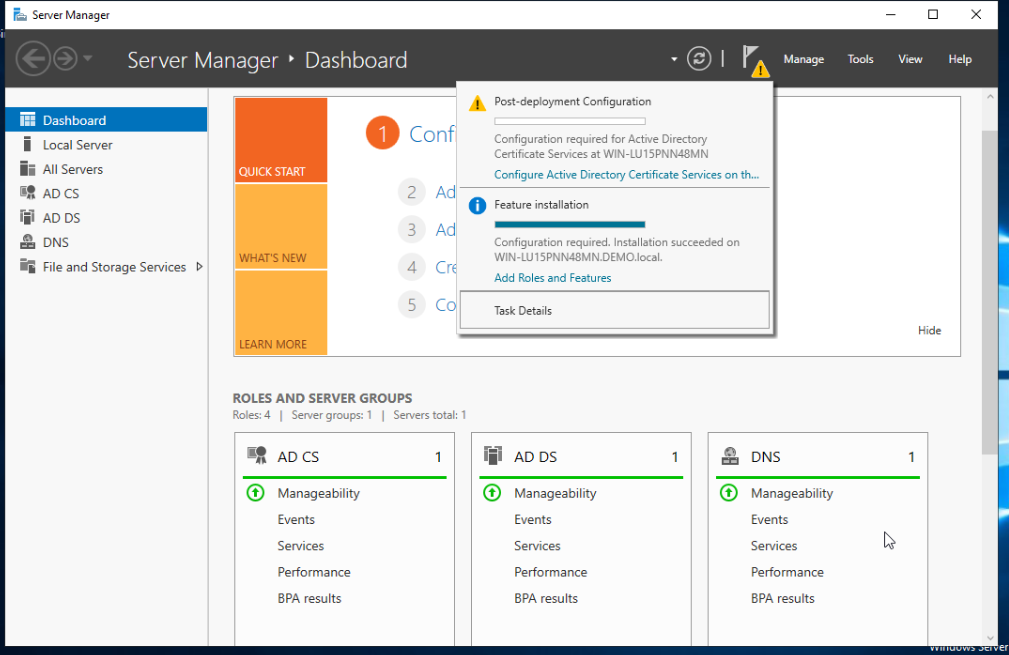
In the role services tap, be sure to check the box for Certification Authority, then we can keep hitting the next key until we reach the validity period. For the sake of convenience, we can put 99 years as the validity period (please don’t do this in real enterprise environment). Then advance through the menu and finally hit configure and restart the server again.
Add users, file shares and service accounts
This is our final step to fully set up our Domain controller. We wanna first add some users to our domain. So from the server manager, click on Tools->Active Directory Users and Computers. Now we see all the objects under our domain, if we open the Users folder, we see that there’s actually only one user, the Administrator. The rest are guest accounts, which is disabled by default and security groups. To declutter this space a bit, we can create a designated OU for the Security Groups. To do so, simply right click on the domain in the drop-down menu on the left, and select new->organizational unit. Then simply drag and drop all the security groups inside the newly created OU.
To create a new user, simply right click on the right list of users on the right, and select new->user. Then give your user a logon name, and a password. Repeat for every user you create.
Note: we can potentially reuse the password to simulate lack password policies in certain organizations (and for the sake of not having to remember different passwords).
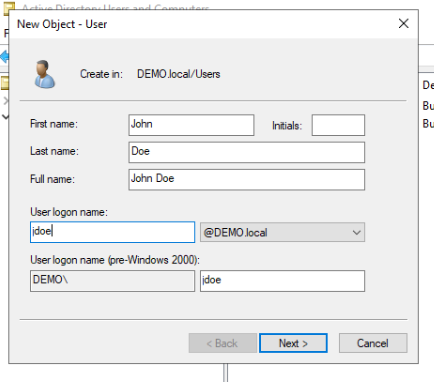
Next, we are going to create a service account since that is also common. We can do so by right clicking on the Administrator and copy that user, since it’s not uncommon to have service accounts running as domain administrator even if people shouldn’t do that. Setting it up this way allow us to explore kerberoasting password attacks.
Then Double click on the user, and we can leave the password in the description for this user. Why? People do this all the time:)

Then we can make this account a actual service account by setting up a SPN (Service Principle Name). Run the following command as Administrator: Remember to replace DEMO with your own domain name.
> setspn -a <DEVICE_NAME>/SQLService.DEMO.local:60111 DEMO\SQLService
> # this asscociates the service and the port together
Lastly we can set up a file share to explore attacks related to SMB. So create a folder anywhere you want, then go to Server Manager->File and Storage Services->Shares, then click on TASKS->New Share...
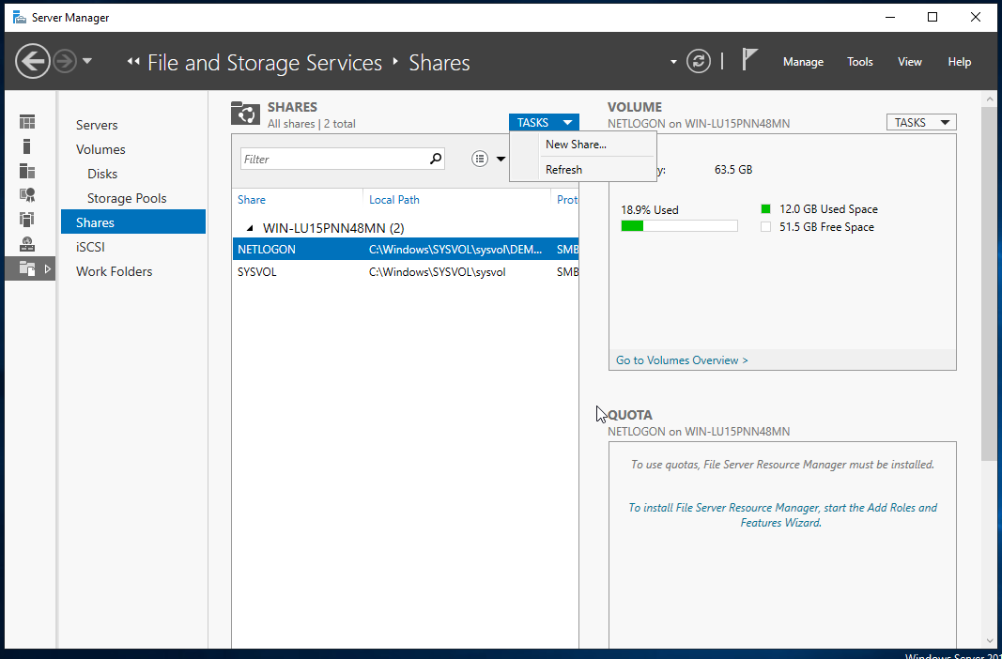
In the New Share Wizard, we can select our folder in the Share Location tab, and select Type a custom path, and select our folder from there. Then advance through the prompt and create the share. Now we have set up SMB share on our machine.
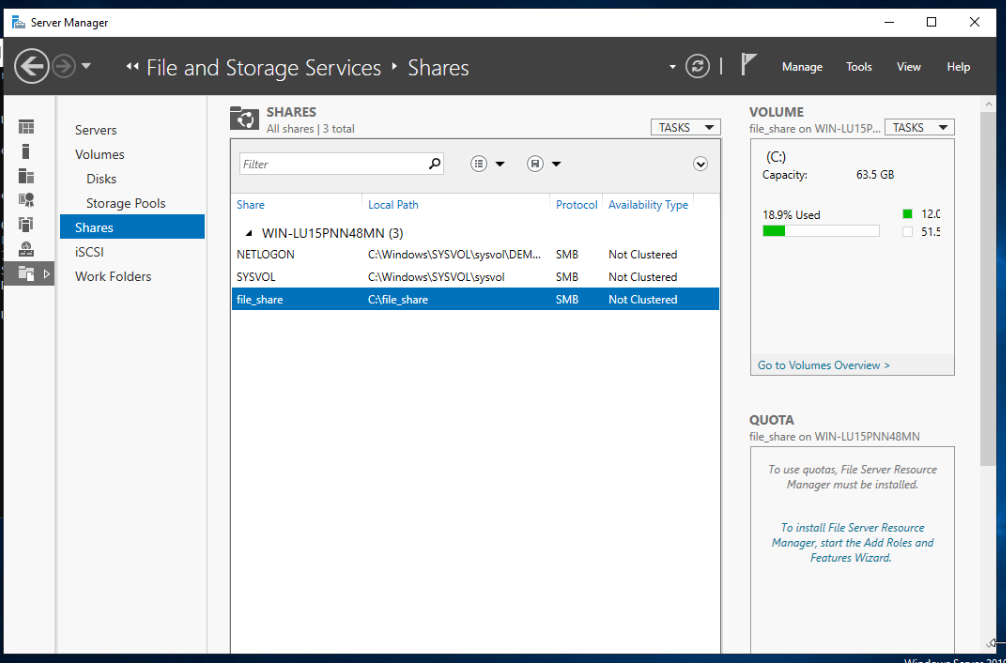
This officially concludes our setup of the domain controller. The next thing to do is to set up our workstations, where user will be able to access their accounts and do work.
Setting up Workstations
Now it’s time to set up our workstations. So one can simply repeat the steps for installing the server, but just replace the installer iso with the one for Windows 10 Enterprise edition. The installer instructions are also the same. So I will not repat them here.
- It may be helpful to change the machine type to
q35, the BIOS type toOVMF(UEFI)and add a EFI Disk, the ones I set up before had the standard BIOS that worked fine, but the ones I set up for this tutorial did not boot.
After installing Windows, we want to set our DNS server to the IP address of our domain controller so that we can actually find our domain. To do so, go to settings->Network & Internet settings-> change adapter settings, then right click on your adapter and select properties->IPV4, and then you can type in your DC IP address for this workstation’s DNS.
To add this machine to our domain, we go to settings->accounts->access school or work and click connect. A Microsoft account login window will pop up. Instead, we want to click Join this device to a Active Directory Domain at the bootom.
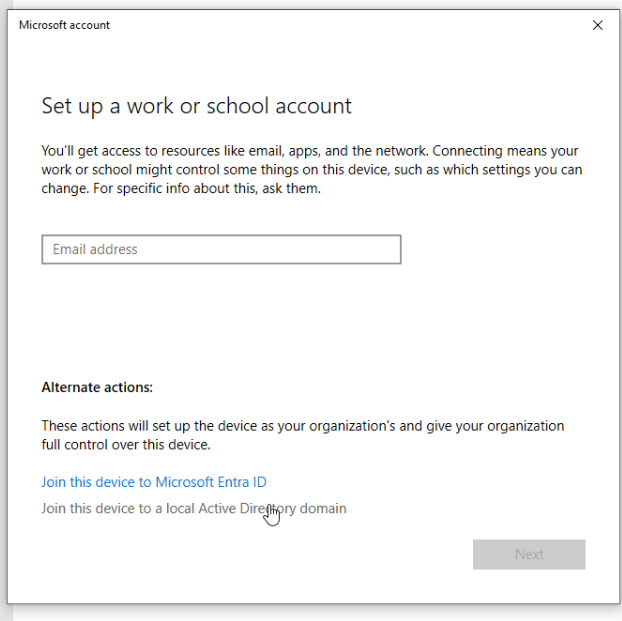
Then simply type in the name of your domain, and then one of your account’s username and password. Hopefully it will be found by your workstation. If not, double check your DNS settings on your workstation, and make sure your DC is set up correctly. For the account type, we can choose Administrator here. This will make the account you select a local administrator on your machine, which allows us to explore why schools won’t allow you to install softwareon your school laptop. After that, we restart, and login to our domain account.
Congratulations, you have connected a Windows workstation to a AD domain. If you check the back on the Domain controller, you should be able to see your workstation in the Active Directory Users and Computers utility.
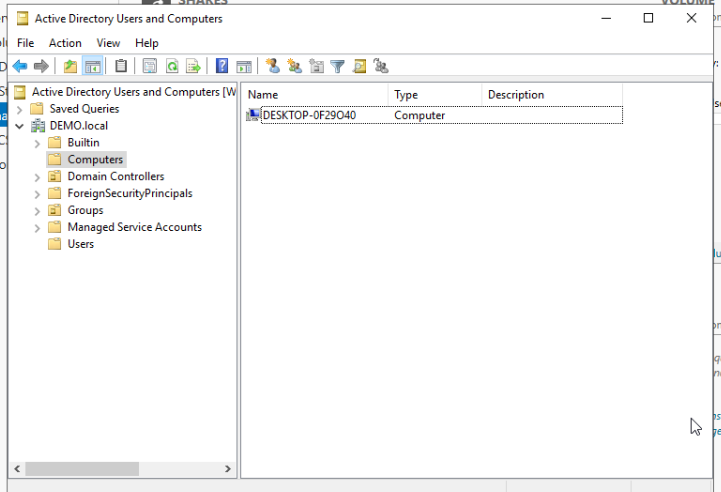
If you want to add more workstations, simply repeat this section of the tutorial for as many times as you want. Generally speaking, you want to have one machine for every user account you added.
Conclusion
You have now successfully set up your active directory environment. In the future, I will write about different attacks one can conduct with environment set up like this.
#cybersecurity #homelab #windows #Active Directory #tutorial